毕业设计基于Python Opencv的车牌识别系统,代码使用Python语言开发完成,可以用来做毕设,大概使用了python3.7.3,opencv4.0.0.21,numpy1.16.2,tkinter,PIL5.4.1等库。Python车牌识别毕业设计系统源码,车牌识别系统主要代码如下
#进行矩形矫正
def img_Transform(car_contours, oldimg, pic_width, pic_hight):
car_imgs = []
for car_rect in car_contours:
if -1 < car_rect[2] < 1:
angle = 1
# 对于角度为-1 1之间时,默认为1
else:
angle = car_rect[2]
car_rect = (car_rect[0], (car_rect[1][0] + 5, car_rect[1][1] + 5), angle)
box = cv2.boxPoints(car_rect)
heigth_point = right_point = [0, 0]
left_point = low_point = [pic_width, pic_hight]
for point in box:
if left_point[0] > point[0]:
left_point = point
if low_point[1] > point[1]:
low_point = point
if heigth_point[1] < point[1]:
heigth_point = point
if right_point[0] < point[0]:
right_point = point
if left_point[1] <= right_point[1]:  # 正角度
new_right_point = [right_point[0], heigth_point[1]]
pts2 = np.float32([left_point, heigth_point, new_right_point])  # 字符只是高度需要改变
pts1 = np.float32([left_point, heigth_point, right_point])
M = cv2.getAffineTransform(pts1, pts2)
dst = cv2.warpAffine(oldimg, M, (pic_width, pic_hight))
point_limit(new_right_point)
point_limit(heigth_point)
point_limit(left_point)
car_img = dst[int(left_point[1]):int(heigth_point[1]), int(left_point[0]):int(new_right_point[0])]
car_imgs.append(car_img)
elif left_point[1] > right_point[1]:  # 负角度
new_left_point = [left_point[0], heigth_point[1]]
pts2 = np.float32([new_left_point, heigth_point, right_point])  # 字符只是高度需要改变
pts1 = np.float32([left_point, heigth_point, right_point])
M = cv2.getAffineTransform(pts1, pts2)
dst = cv2.warpAffine(oldimg, M, (pic_width, pic_hight))
point_limit(right_point)
point_limit(heigth_point)
point_limit(new_left_point)
car_img = dst[int(right_point[1]):int(heigth_point[1]), int(new_left_point[0]):int(right_point[0])]
car_imgs.append(car_img)
return car_imgs
def img_color(card_imgs):
colors = []
for card_index, card_img in enumerate(card_imgs):
green = yello = blue = black = white = 0
card_img_hsv = cv2.cvtColor(card_img, cv2.COLOR_BGR2HSV)
# 有转换失败的可能,原因来自于上面矫正矩形出错
if card_img_hsv is None:
continue
row_num, col_num = card_img_hsv.shape[:2]
card_img_count = row_num * col_num
for i in range(row_num):
for j in range(col_num):
H = card_img_hsv.item(i, j, 0)
S = card_img_hsv.item(i, j, 1)
V = card_img_hsv.item(i, j, 2)
if 11 < H <= 34 and S > 34:
yello += 1
elif 35 < H <= 99 and S > 34:
green += 1
elif 99 < H <= 124 and S > 34:
blue += 1
if 0 < H < 180 and 0 < S < 255 and 0 < V < 46:
black += 1
elif 0 < H < 180 and 0 < S < 43 and 221 < V < 225:
white += 1
color = "no"
limit1 = limit2 = 0
if yello * 2 >= card_img_count:
color = "yello"
limit1 = 11
limit2 = 34  # 有的图片有色偏偏绿
elif green * 2 >= card_img_count:
color = "green"
limit1 = 35
limit2 = 99
elif blue * 2 >= card_img_count:
color = "blue"
limit1 = 100
limit2 = 124  # 有的图片有色偏偏紫
elif black + white >= card_img_count * 0.7:
color = "bw"
colors.append(color)
card_imgs[card_index] = card_img
if limit1 == 0:
continue
xl, xr, yh, yl = accurate_place(card_img_hsv, limit1, limit2, color)
if yl == yh and xl == xr:
continue
need_accurate = False
if yl >= yh:
yl = 0
yh = row_num
need_accurate = True
if xl >= xr:
xl = 0
xr = col_num
need_accurate = True
if color == "green":
card_imgs[card_index] = card_img
else:
card_imgs[card_index] = card_img[yl:yh, xl:xr] if color != "green" or yl < (yh - yl) // 4 else card_img[yl - (yh - yl) // 4:yh,xl:xr]
if need_accurate:
card_img = card_imgs[card_index]
card_img_hsv = cv2.cvtColor(card_img, cv2.COLOR_BGR2HSV)
xl, xr, yh, yl = accurate_place(card_img_hsv, limit1, limit2, color)
if yl == yh and xl == xr:
continue
if yl >= yh:
yl = 0
yh = row_num
if xl >= xr:
xl = 0
xr = col_num
if color == "green":
card_imgs[card_index] = card_img
else:
card_imgs[card_index] = card_img[yl:yh, xl:xr] if color != "green" or yl < (yh - yl) // 4 else card_img[yl - (yh - yl) // 4:yh,xl:xr]
return colors, card_imgs
# 根据设定的阈值和图片直方图,找出波峰,用于分隔字符
def find_waves(threshold, histogram):
up_point = -1  # 上升点
is_peak = False
if histogram[0] > threshold:
up_point = 0
is_peak = True
wave_peaks = []
for i, x in enumerate(histogram):
if is_peak and x < threshold:
if i - up_point > 2:
is_peak = False
wave_peaks.append((up_point, i))
elif not is_peak and x >= threshold:
is_peak = True
up_point = i
if is_peak and up_point != -1 and i - up_point > 4:
wave_peaks.append((up_point, i))
return wave_peaks
#分离车牌字符
def seperate_card(img, waves):
part_cards = []
for wave in waves:
part_cards.append(img[:, wave[0]:wave[1]])
return part_cards
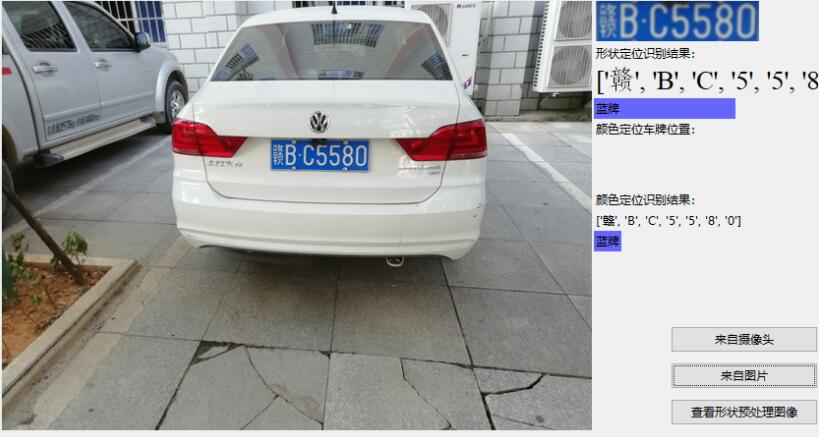
毕业设计基于Python Opencv库的车牌识别效果如下:

需要参考学习的自己扫码下载吧
祝生活愉快!
「一个免费分享计算机毕业设计资源的网站」
下载资源
1
 QQ小程序
QQ小程序
 微信小程序
微信小程序
微信&QQ扫码免费下载毕业设计资源
QQ小程序
微信小程序


共有 0 条评论 - 毕业设计基于Python Opencv库的车牌识别系统_Python车牌识别毕业设计系统源码